Tuesday, March 17, 2009

Ebay Finds

I've been searching quite profusely on eBay for a few old quilts to display in our home (since I lack the transportation to drive miles to estate sales.) I've had to keep budget in mind despite the fact that a good antique quilt has a starting value of $200. However, I did end up snagging a couple exquisite quilts that will suit a couple of the rooms in the home perfectly and within my budget. I am still looking for a quilt large enough to cover our bed, as well as fit in the with the color scheme I've envisioned to have in the room.


My favorite find by far, is this 1922 Red Cross Presentation Quilt from a seller in Washington.


I can't stop talking about this quilt! I have to say that I think the only reason I won this auction was because it ended early in the morning and I made sure I was up. Patriotic quilts like this are highly collectible, especially anything depicting the Red Cross. This one has seen quite a history. I have good reason to believe it may have been on display in Washington at the Red Cross headquarters in 1922 during the time in which the Five-Power Treaty was being deliberated and signed. It is signed and dated 1922. In fact, I think quilts like this rarely come up for auction anywhere. The Red Cross has a 1922 presentation quilt like this in their museum in Washington. I did not know this until I of course started researching my find. I originally chose the quilt for it's striking geometry and vivid color. I thought it would look brilliant against the navy blue and gray theme of our future living room. What a priceless find, our first family heirloom!


My second favorite find so far is this 1920's feedsack quilt from New Jersey.


I won this auction for only $10. This is a lovely early feedsack quilt, that will grace a twin bed in our future cozy guest room. The room will be designed with my young niece Kayla in mind; a bit girly with cottage charm. I already bought the perfect bedstand lamp at a thriftstore to match!

Monday, March 16, 2009

Lesson in Coping A Joint


Liam and I have begun the process of laying down the finishing touch to our bedroom suite. We are cutting quarter round molding to be installed around our base molding.

Quarter round is slightly wider than traditional shoe molding covering about 3/4" of unfinished floor around the trim of our room. It is closer to what would have originally been installed in the house around the thick base-boards.

Modern molding is fairly easy to cut, less dense and is quite flexible.

We used a mitre saw, coping saw, and mitre box attached to a work bench to make accurate 45 degree cuts, coping out the back angle of inside corner pieces. We set up shop in the adjacent unfinished guest room.

There are three cuts necessary in properly installing quarter round:

end of run cut
(used anywhere a strip of molding ends at a door jam on the same wall)


inside cut or cope cut (used at the inside corner of each wall.)

outside cut- (used anywhere a corner protrudes from the room at 90 degrees.)


Stay with us for more posts and photos of the completed room! Coming soon!

Lesson in Wiring.


I picked up a really nice wiring book at Home Depot in order to complete projects necessary to finish off our room!

I am really proud of myself for learning how to install new three prong outlets.

We have an old knob and tube electrical system, so making updates can be tricky. K&T systems are found in homes built from the mid 1800s to 1940s. K&T systems are not to be deemed as bad or inferior however, infact they were made to last indefinately, 100+ years. The people installing them were highly skilled, as there was a fear of electricity and little understanding of it's nature back then. Thus, wires were almost mummified, wrapped incredibly well in rubber, and asphalt coated cloth made to contain even intense heat, and then wrapped tightly around porcelain knobs. These knobs were meant to act as insulation even if and when wires were to become exposed. The knobs were also meant to keep the wires away from flammable rafters. The neutral and hot lines in a K&T system run independently as this was meant to make sure they never touched, potentially creating a short circuit. The only downside to this old style of wiring is no ground wires, making it difficult for updates. In addition to a lack of grounding ability; like ours, many older systems had neutral and hot lines that were not color coded, requiring careful skill to make sure wires were not crossed and incorrectly installed to the terminal.

I can say that I have successfully installed two new three prong outlets in our bedroom. We had one existing grounded three prong that had been painted over and one old un-grounded two-prong. Unfortunately, I discovered that only 1 two-prong outlet in the entire house was installed after 1970, therefore containing a ground wire. All the other outlets are quite old, a couple are even I would say antique. This is going to pose a bit of a challenge.

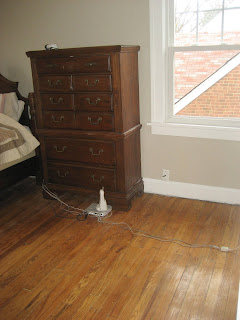
I simply replaced the two-prong outlet in our bedroom with a three prong open grounded outlet, and eventually I will need to pull out a slug and fish down a green grounding wire, to ground to one of the last remaining copper cold water pipes. (the rest of our pipes are pvc.) Currently, the thee prong outlet however poses no threat, and will allow us to plug in a surge protrected multi-outlet in order to plug in our phone, internet, and a basic lamp. Otherwise, conditions were poor, plugging everything in with adapters, which fall out or get tugged easily which could even result in damage to the old lines. The three-prong works great, and looks great, so we'll stick with this set-up for now.

Sunday, March 1, 2009

Our New Gettaway!


I have never been so proud of anything I've ever accomplished in my entire life. This is hours and hours of painstaking labor...

I began this project in early January, spackling and sanding each and every inch of this room. I carefully knocked out old cracking plaster, chiseled out multiple shelving grommets that had been covered over with sloppy putty, then I re-filled the cavities, and sanded them clean. I reworked every inch of the bedroom corner wall and ceiling seams, chiseling out loose plaster, bulging plaster and refinishing them with joint compound and sanding by hand. I carefully re-seamed the base-molding that was in areas (almost 1" from the wall.) and then carefully filled in cracks, and knicks with wood putty prior to sanding each area smooth using an orbital hand sander and manual hand sander tools. All the base molding, walls, and window and doorway casings were spackled with putty where necessary and sanded smooth, then primed with two coats before being repainted. For the past three weeks, I have worked endlessly from morning, until often midnight priming, painting, and meticulously finishing each and every detail. However, I will not go without saying that I could not have done it without Liam's help. He came home exhausted, working 50+ hour weeks to help me, doing whatever he could. His restoration of the hardwood floors however was the miracle foundation to the entire room! It is my favorite part. He spent nearly two months rendering the 80 year old floors a masterpiece of craftsmanship sanding by hand with a dragster belt sander, with medium, coarse, fine, and ultra fine sandpaper.

We have every right to be so proud!

The room of course is not however entirely completed as we plan to refinish the original closet and entry doors, as well as re-fit them with vintage period style hardware. We will then lay down the shoe molding. We will also install a new ceiling fan, and update our oulets and phone jack. Of course, we will be hanging curtains shortly...

The new room lay-out optimizes space and privacy, opens up the room, and showcases the hardwood floors!

BEFORE:


AFTER: