Wednesday, December 16, 2009

Updated Side Entry!

1. New custom colonial storm door.
2. Vinyl siding repaired!
3. New light fixture to match!
4. New doorbell! ding-dong!

Merry Christmas to us from us!


BEFORE:

WOW!!!!!


In the spring, the side entry exterior will receive the finishing cosmetic fixes which will include total restoration of the entry door and hardware. It will be painted deep red to match the 2nd floor patio door.

Breakfast Room Updates

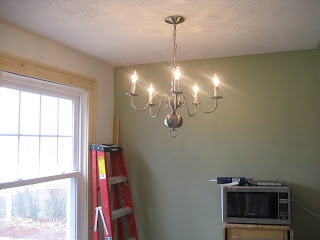
The chandelier is in!... as well as the new switch to turn it on.

What goes through one's tiny mind when they haphazardly install a large room ceiling fan in a very tiny room with a low slanting ceiling? When did it become logical to use electrical tape in place of a wire nut?

I need Robert Ben Garant to take notes on this project while wearing a monkey suit.

How many monkeys does it take to screw in a lightbulb? : I don't know sir, we don't have enough information yet!

WELL, I NEED ANSWERS!....


"Quick, how many monkey's have you seen today?!"

"Sir, with all due respect sir, I don't understand the question!"


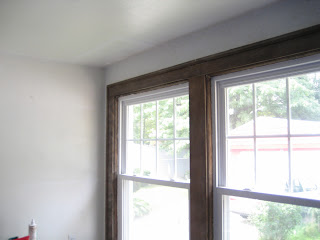
Okay, moving on to the window casing. As you can see there has been progress! We'll be back soon with photos of the apron installation.

BEFORE:

Wednesday, November 11, 2009

That's What It's All About!

PREPARE TO BE BLOWN AWAY! I've done my best to create a slideshow here to showcase the renovation of the rear addition (what we are calling the cardroom & breakfast room/eat-in-kitchen respectively.)

Photos dating all the way from August 2008 to today. The original inspiration, and the scope of the work that has been done in the past three months.

We faced carpenter ant infestation, carpenter ant damage, water damage, damaged joint seams, dry rot, rot, electrical boxes consumed by rust and everything in between. There was more work completed solely by Liam and myself than we were able to document on camera.


Work is still going on, but we are finally entering into the final stages.

UP NEXT...Window casing is about to go into place. New light fixtures, and some electrical changes will be made. New baseboards will be installed, as well as new pantry door. Additional painting of course, and some cosmetic fixes for cold air return and vents. It is a masterpiece for which we are extremely proud!

A gem of a property!

Now the ball is really rolling. We've just replaced the front storm door which was missing hardware to close and had a whacky glass storm panel insert which was leaking out all sorts of hot air and leaking in all sorts of cold air. The exterior entry door we have inside the sunporch has a 1" gap beneath it from when previous owners planed the door down to accomodate carpeting. It also has a lot of glass, so without a proper storm door, we were in for a big draft.

I will get to that entry door next spring. It will be stripped, refinished, re-weatherstripped, etc.


Anyway, we finally had our custom Anderson storm door installed. This is an Anderson 2000 series with a 79" height. (All our entry doors are 79" tall) Full glass with slide away screen. It looks lovely on the house. We already feel the energy savings! AND Now the kitties can enjoy going out on the sunporch when the weather is not too cold.

COMING UP FOR EXTERIOR...
Mailbox and address sign will see updates soon...
Side entry door will be worked on by Barry...re-glazed, new lock, new trim, and new storm door with cross panels will be installed shortly, and a new light fixture.

Monday, October 26, 2009

Found Treasures!

When we bought the house, I sort of didn't remember all the sweet little details that made us want to buy it. Now, I'm of course noticing these little things all the time. A lot of treasures were looted here, but at least we have these small gems for keeps...

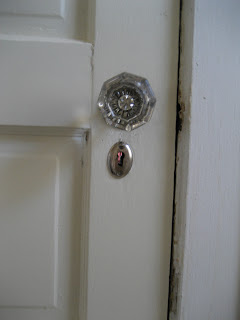
This stunning crystal door knob is especially bright, and large! The flat face on it is a clear window to the mesmerizing star in the center! I also love the pewter.


Not a chip on it, despite the abuse this house has seen. It's like little miracle.

And then on the reverse we have this gorgeous copper knob! I gently cleaned it up using "bar keeper's friend." and it left just that beautiful dark patina. I coated it then with a clear coat of enamel to protect it from too much oxidizing and tarnishing. It was mostly green before as you will see. Nothing wrong with that! It's just so nice to see that copper hue come through again.


BEFORE...

Wednesday, October 21, 2009

RED DOOR!

We now have a red exterior door that leads from the upstairs bathroom to a small outdoor patio.

It was once the worst door on the exterior of the house, and it is now the best!

During a two month restoration, this early 1930s craftsman style door with original blown glass, copper exterior knob and large crystal interior knob, has made a wonderful recovery! Look below for the BEFORE images. We believe over 30 layers of oil & lead paint were removed.


The copper knob has been beautifully restored leaving the dark worn patina. (more photos later.)

The interior has been painted a very nice country beige and looks great! In addition we spruced up an already decent storm door with a new closer and hardware.

I will have additional photos posted to the blog after re-installation of the doorknobs and the new weather stripping, and once everything is cleaned up.

BEFORE:


Tuesday, September 22, 2009

Glass Knobs!


I adore glass door knobs. We had a few in the house. There is a stunning large size glass knob on the craftsman door that leads to the porch. It's the largest glass knob I've ever seen and I will update with a photo of it one day...

Anyway, Liam and I browsed some local antique stores to find some more glass knobs for the upstairs doors. They are pretty expensive, as you might imagine...but thanks to eBay, I was able to come up with a set of four stunning glass knobs from a 1906 house for only $44! I'm in love with them. We just installed one on our bedroom closet and we plan to put the rest of the entry doors in the hallway when they are refinished.

Sometimes I day dream. I get little visions in my imagination of what the house looked like when it was first built inside and out. The house gives me lots of clues. It speaks to me. It knows I listen and I look.


I know that it was slate blue gray and dark green trim. It had a large colonial revival full open porch. The inside was filled with gleaming dark rich lacquered wood work. The staircase was stunning with its art nouveau details that still remain today, although it shined with the most glossy dark finish! I don't doubt that you used to be able to see your silhouette in the stairs and the floor. Many things changed even 10 years after it was built perhaps...always changing. It was always a house built to entertain! It was the most lovely hostess. It could take your coat at the door, and it danced you right into the warmth of its over sized fireplace surrounded by glowing book cases...it longs to entertain again. I promise that it will.

Card Room Update


Hello, I've been really busy. I've been meaning to update this blog of course. I can't even think straight right now. Let's see...

We are almost finished with the drywall repair in the back addition. A few more days to go on that. The wall is looking much better. It has received a couple skim coats.

We had a new gcfi outlet installed and a new electrical box. The previous outlet was rusted to the core from the water coming through that wall from the bad roof.

The large double window casing has been stripped. It's ready to be gently sanded and then we will apply a polyurethane finish.

The eat-in-kitchen window casing is in the process of being rebuilt. We'll update you on that as we go along.

We will be preparing to prime the walls shortly. Then, stipple the ceiling.

Sunday, September 13, 2009

Master Bedroom Update

Almost finished decorating the master bedroom. Added a new quilt and pillow shams. Still hoping to hang a nice shelf with some candles and maybe a picture or two, but it's really amazing to us that this is how our room looks today, and to think of how it once was only a year ago.


Cardroom + Kitchen Renovation Part II

Here are some photos to show what's been going on with the drywall. These were already taken several days ago. Currently, the wall is almost finished and looks a lot better than it did here in these photos. New photos will be added shortly.

Wall is currently undergoing skim coat treatment to smooth any imperfections. The window casing has been stripped of all the paint and the stain has been lifted to a medium brown shade that will look nicely with some sanding and polyurethane to finish it.


Wednesday, August 12, 2009

1950s CARD ROOM comes to life...

IT'S ALIVE!

This is the major renovation project going on right now. Future Card Room & Eat-in-Kitchen. Busy, busy, busy...very little time to blog about it, but I will post some photos to display what has been going on.

To sum it up, we're rebuilding the portion of the wall that was damaged by the carpenter ants, installing new insulation in that portion of the wall and ceiling. Then we will be installing new drywall segments to refinish the water damaged wall.

The window casing has been mostly removed, saving the left side & as soon as the new drywall is in place and skim coated, Liam will begin building the new window frame.

My job is to cover all the cosmetics. I am stripping the large double window. It was caked with many layers of paint, and in taking it off, it will become a stunning wall of beautiful woodframe windows. This project alone will take me about three weeks to complete.

In the meantime I will be repairing all the joint seams, and carefully spackling all of the drywall.

I am also reviving a walk in storage closet as our future walk-in pantry. Liam will be building new shelving.

That's all going on right now.


stripping window casing...(day 3 photographed here)

Liam's beautiful carpentry patch for the damaged wall.

super handsome carpenter at work.

lumberjack lamb!


getting started here.


handy laddercat.

future somewhat walk-in-able pantry.

major split wall joint about to be magically repaired.

There's really a more impressive before & after than the one you're about to see. Before this, I chiseled and knocked-out and sanded gobs and slops of caulk from a crazy lazy previous repair.

& now for the drywall tape miracle.


AFTER


BEFORE

HEALED!

some like to use a drywall hawk...I prefer a drywall cat.

CARD ROOM COMES TO LIFE...


BEFORE (August 2008)