Thursday, March 25, 2010

C&L Restoration...

That's us!

I am very pleased to present the first wall of wainscoting that has been completed. Liam did all the carpentry himself. My job was to make the exposed plaster look good again...I must say, we both did a tremendous job. Yeah, that's not new drywall...that's the original plaster wall by the way.

Photobucket

Photobucket

Photobucket

Finished!

Photobucket

Seen here in 2008 after 1940s plastic tile removal...

Photobucket

As you can see the previous tile was about 2 1/2 ft higher. It was towering over the doorway. It's a narrow squeeze to begin with, and that really closed the space in. Of course, that was only the tip of the ice-burg when it came to removing that tile.

The new wainscoting is the perfect height, and will really make the space inviting and elegant again. It will be painted white, and the walls a historical soft yellow.

Monday, March 15, 2010

Foyer Update: Wainscot

We have finished restoring the plaster walls in the side entry foyer. This is very exciting. We have primed the walls with an initial coat of Kilz High Build and prepped for the wainscoting installation.

Over the weekend, we were able to finally begin installing the wainscoting on the walls...after patiently making careful measurements, marking the wall, finding the studs, and making the perfect cuts with our new jigsaw. Oh, and to adjust the level of the switch, we used some rubber washers.

For the installation, we used Liquid Nails, and some 3/4" finishing nails.


Up next, we will continue installing the wainscot, making the special cuts for the stairs, the chair rail, and the base cap. We'll be looking at new vinyl flooring for the stairs and landing.

Wednesday, February 24, 2010

Broom Closet Repair

The side entrance, again is one of our challenging cosmetic renovations. In 2008, we removed red and green plastic tiles and molding asbestos mastic.

So far in 2010, we've conquered the basement steps from hell, and now we've overcome the slasher pepto bismol broom closet.

Here are some photos from the closet repair.


Friday, February 19, 2010

Stair Treads

I ordered these stair treads for $14.95 from Amazon. They came in a pack of 7, which is just what we needed. They work great for this type of application. We simply needed something that would prevent slipping, hide dirt and footprints, and look nice at the same time. These are machine washable. Let's see if they can hold up to four cats, and the amount of debris from our projects.

They are already being put to the test.

Exhibit A


Finished Steps


Before:


"Who would have thought that a 90 pound female armed with only a hair dryer in one hand and a paintbrush in the other could have conquered the steps from hell? Now, you know."

-Phil

Wednesday, February 10, 2010

Basement Steps Makeover

Projects at the house have slowed down since Christmas. It's been difficult to get the ball rolling again. I was sick over the last couple of weeks, and managed to fracture a rib while coughing...Well, I'm gradually feeling better and hope to accomplish some things on the winter project list again soon!

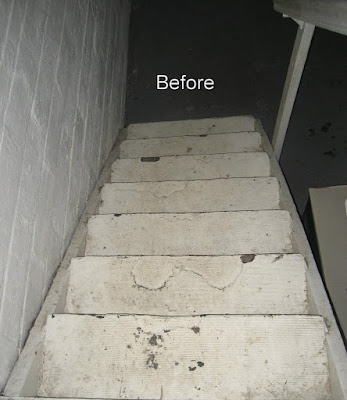
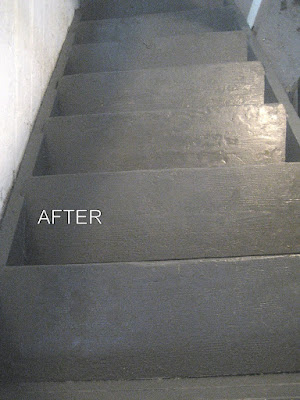
We've faced some really tough cosmetic challenges in renovating this house, one of them being these basement steps. I've wanted to tackle them for a long time, but could not get away from my other projects. Finally, we've made a huge difference in their appearance.


How We Did It:

1. removed disintegrating, and peeling rubber stair treads. (they had been painted white and had gum stuck to them, and were covered in grime.) using a crowbar, and a hairdryer to soften the mastic glue.

2. stripped black mastic glue using Bean-e-doo mastic remover which I was able to get at a pretty good discount from a seller on eBay. Great product, not reccomended for wood, but it did do the job without hazardous chemicals which was a concern for us, as we have four cats.

3. Stairs scrubbed & cleaned with soap and water

4. Wood puttied where it was necessary. Allowed that to dry.

5. Sanded wood putty, & lightly sanded peeling paint & rough surfaces. (avoid breathing lead dust.)

6. applied Zinsser Peel Stop to peeling paint and rough surfaces.

7. Applied 1 coat of Kilz Casual Colors One Coat Paint (Dark Umber)

Allow that to dry and apply one more coat where necessary.

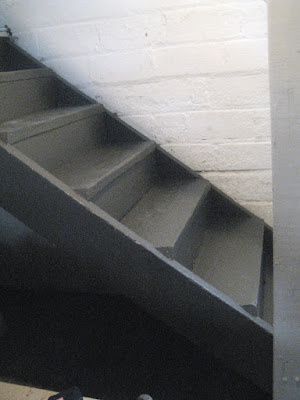
In a few days the stairs will be finished and dry enough to install some pretty carpet stair treads which I ordered from Amazon.com

Wednesday, December 16, 2009

Updated Side Entry!

1. New custom colonial storm door.
2. Vinyl siding repaired!
3. New light fixture to match!
4. New doorbell! ding-dong!

Merry Christmas to us from us!


BEFORE:

WOW!!!!!


In the spring, the side entry exterior will receive the finishing cosmetic fixes which will include total restoration of the entry door and hardware. It will be painted deep red to match the 2nd floor patio door.

Breakfast Room Updates

The chandelier is in!... as well as the new switch to turn it on.

What goes through one's tiny mind when they haphazardly install a large room ceiling fan in a very tiny room with a low slanting ceiling? When did it become logical to use electrical tape in place of a wire nut?

I need Robert Ben Garant to take notes on this project while wearing a monkey suit.

How many monkeys does it take to screw in a lightbulb? : I don't know sir, we don't have enough information yet!

WELL, I NEED ANSWERS!....


"Quick, how many monkey's have you seen today?!"

"Sir, with all due respect sir, I don't understand the question!"


Okay, moving on to the window casing. As you can see there has been progress! We'll be back soon with photos of the apron installation.

BEFORE: